Custom Cursor using Framer Motion
In this article I will demonstrate, how to make a custom cursor using Framer Motion, React.

A web developer looking to learn and build the most breathtaking projects. Interested in all things Javascript/Typescript. Hopping from one framework to another.
This will be a short article since this is a fairly straightforward thing to do.
Libraries Used
- Framer Motion: A motion animation library that works perfectly with ReactJS
Project Setup
Setup a Barebones React/NextJS project using any template. I'll be using NextJS with Typescript and TailwindCSS, which at the time of writing is the default NextJS template.
Install Framer motion library
npm install framer-motion
Refer to the Framer Motion Docs for any issues
- Remove the boilerplate code if needed. I'm adding
cursor-noneto hide the default cursor across our app.
export default function Home() {
  return (
    <main className="flex cursor-none min-h-screen flex-col items-center justify-center">
    </main>
  );
}
Adding the Framer Motion Component
Create a separate component labeled
CustomCursor.tsxand add it to the required entry point in the project."use client"; import { motion } from "framer-motion"; import { useEffect, useState } from "react"; import React from "react"; export const CustomCursor = () => { return ( <motion.div className="fixed h-8 w-8 pointer-events-none rounded-full" ></motion.div> ); };Now this
motion.divcomponent will be our new cursor. The div component offered by Framer Motion has props that let us animate, translate, and implement actions based on user events.So we will use the props,
animate&variantsThe animate prop is used to pass
An object containing different values, that need to be animated
Active variant: A variant is also a set of values that need to be animated
But the difference between the two is that in case we have multiple different states that need to be animated for different scenarios then instead of having multiple if else and separate logic functions we can have different variants.
In this case, we pass an object which has all the different variants defined, and the animate prop will then be used to pass the active variants. This might still need logic functions but it will be easier to understand and update.
<motion.div
        className="sm:visible fixed h-12 w-12 pointer-events-none rounded-full"
        animate={{
          backgroundColor: "transparent",
          border: "1px solid #08080D",
          borderColor: "#F0F9F6",
        }}
      ></motion.div>
But this does not make our element move according to the cursor. So we will add an event listener, that listens to the 'mousemove' event inside a
useEffecthook.This event listener will save the position of the mouse cursor variable that can be inside a state variable
const [mousePosition, setMousePosition] = useState({
    x: 0,
    y: 0,
  });

  useEffect(() => {
    const onMouseMove = (e: any) => {
      setMousePosition({
        x: e.clientX,
        y: e.clientY,
      });
    };

    window.addEventListener("mousemove", onMouseMove);

    return () => {
      window.removeEventListener("mousemove", onMouseMove);
    };
  }, []);
The animate prop accepts the x, and y coordinates of the element, so on each update of the coordinates, it will be animated.
Now the stored cursor position will be passed to the
motion.divelement through the animation prop
animate={{
x: mousePosition.x - 24,
y: mousePosition.y - 24,
backgroundColor: "transparent",
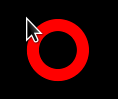
border: "10px solid red",
}}
Here the x, and y coordinates are subtracted by 2* height/width of the element respectively since the element's top left pixel will align with the cursor and not the center of the element which will give trouble while clicking if the cursor is invisible. Or you can keep it like that if you want a challenge ;)
Now there is also a transition prop that can be used to alter the animation duration, transition style and other properties.
transition={{ duration: 2, type: "spring", stiffness: 100, mass: 0.1 }}
And that's it. You can now change the style of the custom cursor element however you want and use it as your cursor.
  "use client";

  import { motion } from "framer-motion";
  import { useEffect, useState } from "react";
  import React from "react";

  export const CustomCursor = () => {
    const [mousePosition, setMousePosition] = useState({
      x: 0,
      y: 0,
    });

    useEffect(() => {
      const mouseMove = (e: any) => {
        setMousePosition({
          x: e.clientX,
          y: e.clientY,
        });
      };

      window.addEventListener("mousemove", mouseMove);

      return () => {
        window.removeEventListener("mousemove", mouseMove);
      };
    }, []);
    return (
      <motion.div
        transition={{ duration: 2, type: "spring", stiffness: 100, mass: 0.1 }}
        className="sm:visible fixed h-12 w-12 top-0 left-0 pointer-events-none rounded-full"
        animate={{
          x: mousePosition.x - 24,
          y: mousePosition.y - 24,
          backgroundColor: "transparent",
          border: "10px solid red",
        }}
      ></motion.div>
    );
  };
If you want to see the entire structure, view the code here.
Thank you for reading, comment if you find any issues, need any clarifications or know of an easier approach.
Happy Learning!


